Find out how to clean the filters of your Philips Vacuum Cleaner regularly, and ensure its optimal cleaning performance, in the article below.
How should I clean the filter of my Philips Vacuum Cleaner?
Published on 20 January 2025
Cleaning the filter of the vacuum cleaners with dust bag
Your bagged Philips Vacuum Cleaner has two filters, a motor protection filter and an exhaust filter.
The motor protection filter is washable and should be cleaned every four to six weeks, or at least every time you replace the dust bag. We recommend replacing this filter every year. The exhaust filter is not washable and it is sufficient to replace it annually.
Cleaning the motor protection filter:
The motor protection filter is behind the dust bag. To access the filter, remove the dust bag holder along with the dust bag. Follow these steps to clean the filter:
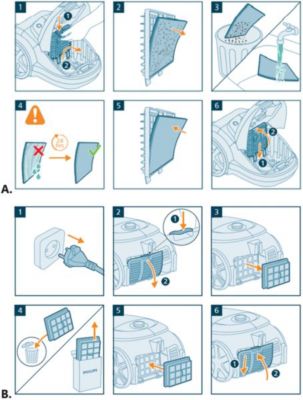
- Take the filter case and foam filter out of the appliance (image A1).
- Separate the washable foam filter from the filter case (image A2).
- Tap the foam filter over a trash bin to clean and wash the filter gently to remove embedded dirt. Focus on areas with noticeable buildup, but refrain from strong scrubbing to not damage the filter fibers. Rinse the filter under running water until the water runs clear (image A3).
- Wait 24 hours until the foam filter is fully dried (image A4).
- Reassemble the parts (images A5 & A6).
Replacing the exhaust filter:
The exhaust filter is on the back (or at the bottom) of your Philips vacuum cleaner, behind a removable grille. This filter should not be washed or cleaned. For optimal performance, we strongly recommend replacing the exhaust filter every year (image B)
If you have any questions after reading this article please feel free to contact us for further assistance at http://www.philips.com/support.
Cleaning the filters of the vacuum cleaner with bag
Your bagless Philips Vacuum has two filters, a motor protection filter and an exhaust filter. The motor protection filter is washable and should be cleaned regularly. The exhaust filter is not washable, and it is sufficient to replace it annually.
Cleaning the motor protection filter:
The motor protection filter is usually in or behind the dust container. To clean the filter, follow these simple steps and/or watch the video below:
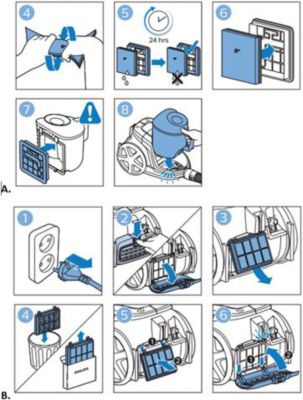
- Take the filter out of the appliance (image A1).
- Separate the foam filter from the filter case (image A2).
- Wash both parts to remove embedded dirt. Focus on areas with noticeable buildup, but refrain from strong scrubbing to not damage the filter fibers. Rinse both parts under running water until the water runs clear (image A3).
- Wring out the foam filter to remove excess water (image A4).
- Wait 24 hours until both filters are fully dried (image A5).
- Reassemble the parts (images A6-A8).
Note: for optimal performance, we recommend cleaning the motor protection filter every six weeks and replacing the filter every year.
Replacing the exhaust filter:
The exhaust filter is on the back (or at the bottom) of your Philips vacuum, behind a removable grille. It is not necessary to clean this filter and it should not be washed. For optimal performance, we strongly recommend replacing the exhaust filter every year (image B).
Play Pause