Philips Support

How to connect a Laptop or Personal Computer (PC) to my Philips TV?

Published on 2016-12-29

Important: Read the instruction provided by your PC or graphics card maker on how to setup the PC/graphics card before connecting to the TV. Make sure that you have installed the latest software on your PC and the PC graphics card has the latest drivers. For detailed information, please refer to the website of your PC or graphics card maker.

There are three ways to connect a PC/laptop to your TV:

Digital connections

  • HDMI to HDMI
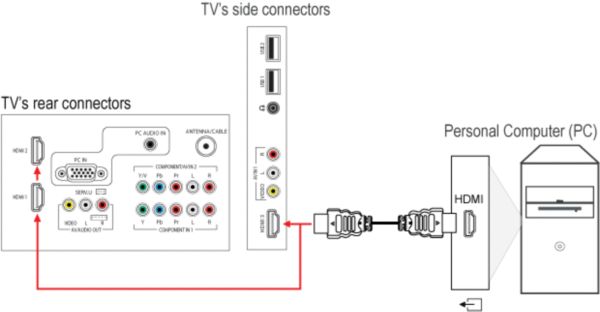
    Connect the HDMI connection of the Laptop/PC with an HDMI-HDMI cable to the HDMI connection of the TV.

  • DVI to HDMI, with an added audio connection
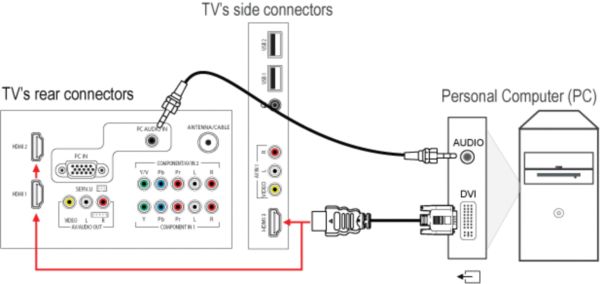
    Connect the DVI connection of the Laptop/PC with a DVI-HDMI cable to the HDMI connection of the TV. Alternatively, use a DVI-DVI cable and a DVI-HDMI adaptor. Connect the audio cable from the AUDIO OUT connection of the Laptop/PC to the PC AUDIO IN connection of the TV.

Analog connections

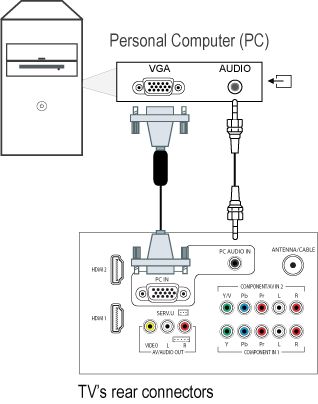
  • VGA to VGA, with an added audio connection
    Connect the VGA connection of the Laptop/PC with a VGA cable to the PC IN connection of the TV. Connect the audio cable from the AUDIO OUT connection of the Laptop/PC to the PC AUDIO IN connection of the TV.

When you have selected the type of connection you want to use, press the [Source] button on the remote control. Use the cursor [Up] or [Down] to select the TV connection you have used to connect your computer and press the [OK] button in order to switch the TV to the computer.

Alternatively, you may add the computer as an item in the home menu and select the computer via the home menu.

Follow these procedures to add your devices:

1) Press the [Home] button on the remote control to access the home menu.
2) Use the [Cursor buttons] to select [Add new device] and press the [OK] button.
3) A message appears, prompting you to add a new device.
4) Select [Start] and press the [OK] button.
5) Use the cursor [Up] or [Down] to select [Computer] and press the [OK] button.
6) Use the cursor [Up] or [Down] to select the TV connector you have used to connect the computer and press the [OK] button.

Note: If a particular connector has already been assigned to another device, it will not show up in the list of connectors.

7) When the guide is completed, press the [OK] button.
8) A new computer item is added to the home menu.
9) Press the [Back] button to exit the menu.

Follow these steps to connect the devices:Step 1-7

1) Switch the Laptop/PC and the TV off.
2) Connect the Laptop/PC choosing one of the above solutions.
3) Switch the TV on.
4) Use the [Source] button on the remote control or select the [Computer] item via the home menu to switch the TV signal to the computer.
5) Switch the Laptop/PC on.
6) In some cases, you need to toggle the Laptop/PC to display the video image onto the TV screen.

Note: Please refer to your Laptop/PC manual to determine which keys are used for the transfer function.

7) Example of the common function keys use by Laptop/Notebook manufacturers such as ‘Fn’+‘F8’ keys.

Step 8

8) Hold down the ‘Fn’ key, and toggle the ‘F8’ key (or key determined by the manufacturer) once or two times.

Step 9

9) This will switch the video image to the Laptop/PC display only, the TV only, or the Laptop/Notebook display and the TV simultaneously.

Ensure your PC is set to a resolution and video/audio format that the TV supports.

Supported formats

The following display resolutions, video/audio formats and refresh rates are supported in PC mode:

Computer formats:

  • 640 x 480 - 60 Hz
  • 800 x 600 - 60 Hz
  • 1280 x 768 - 60 Hz
  • 1360 x 768 - 60 Hz
  • 1920 x 1080 - 60 Hz

Video formats:

  • 480i - 60Hz
  • 480p - 60Hz
  • 576i - 50Hz
  • 576p - 50Hz
  • 720p - 50, 60Hz
  • 1080i - 50, 60Hz
  • 1080p - 24, 25, 30, 50, 60Hz

Audio formats:

Your TV supports only PCM and AC3 audio format if it is connected by HDMI. If your TV does not receive any sound over an HDMI connection, make sure that your PC is transmitting the audio in PCM or AC3 format. Refer to the user manual of your PC to verify whether your PC is configured correctly.

To adjust TV settings for best picture and audio:

You can use the [Smart Picture] and [Smart Sound] settings in the Adjust menu to set your TV to a predefined mode that will give you the best picture and sound quality.

Note: The [Smart Picture] is not available when the computer format is set to PC resolution.

Follow these steps to select the settings that suit to your preferences:

  1. Press the [Adjust] button on the remote control to access the Adjust menu.
  2. Select [Smart Picture] or [Smart Sound] and press the [OK] button to display the list of available settings.
  3. Press the cursor [Up] or [Down] to select the predefined settings according to your preference.
  4. Press the [OK] button to confirm.
  5. Press the [Back] button to exit the menu.

Alternatively, follow these steps to manually adjust the settings that suit to your preferences:

Step 1-3

1) Press the [Home] button on the remote control to access the home menu.
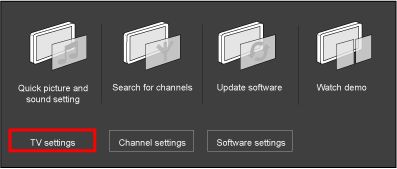
2) Use the [Cursor buttons] to select [Setup] and press the [OK] button to confirm.
3) Select [TV settings] and press the [OK] button.

Step 4-7

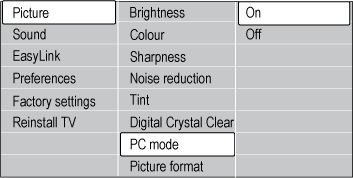
4) Press the cursor [down] to select [Picture] or [Sound] and press the cursor [Right].
5) Press the cursor [Up] or [Down] to select a setting.
6) Press the cursor [Right] to select and use the [Cursor buttons] to adjust or set them according to your preferences.
7) Press the [Back] button to exit the menu.

Note:

  • This TV supports HDMI to DVI (PC output) connection
  • Picture quality cannot be guaranteed due to the differences in PC operating systems and video cards
  • Select [Unscaled] picture format to provide maximum detail for PC or HD content
  • Make sure the PC graphics card has the latest drivers and the TV has the latest software installed

If the source signal is of 480P/720P/1080P content and when the TV is used as a monitor for home and office work, it is recommended to set the [PC mode] in the TV menu to [On] mode for best signal handling.

HDMI to HDMI

DVI to HDMI

VGA to VGA

Contact Philips

We are happy to help you

Contact Philips

We are happy to help you

Looking for something else?

Discover all Philips Support options

Our site can best be viewed with the latest version of Microsoft Edge, Google Chrome or Firefox.