If you need to remove and reinstall the shaving heads of your Philips shaver (sometimes referred to as an electric razor), please refer to the information below.
For routine deep cleaning and replacing the shaving heads, you'll need to know how to remove and reinstall the shaving heads. This is essential to keeping your Philips shaver in good working order.
Please note: the images below may differ from your Philips shaver model, but the same principles apply. Refer to the user manual for specific instructions for your shaver.
How do I remove the shaving heads of my Philips Shaver?
Published on 10 February 2026
Get to know your shaver
Important: While most Philips shaver models are waterproof, some models are not. The cleaning instructions in this article apply to waterproof shavers only. To find out if your shaver is waterproof, please refer to the user manual or look for a small symbol showing a tap or bathtub/shower on the shaver handle.
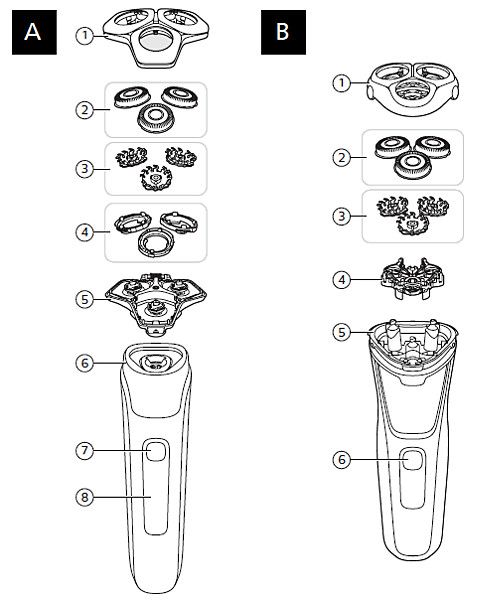
Please refer to illustrations A and B below to familiarize yourself with which parts of your Philips shaver are removable. These are the two most common types of Philips shavers, but individual models may have slight differences.
The numbered lists below indicate the names used for each part. Numbers 2 and 3 form the shaving heads of your Philips shaver.
Illustration A (shaver with retaining rings):
- Shaving head holder
- Guards
- Cutters
- Retaining rings
- Shaving unit with hair chamber
- Shaver handle
- On/Off button
- User interface (differs per model)
- Shaving head holder
- Guards
- Cutters
- Retaining frame
- Hair chamber
- On/Off button

Shavers with retaining rings
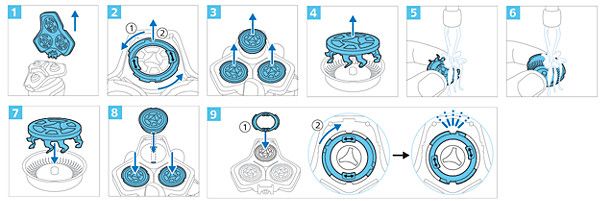
The information in this section applies to all Philips shavers with individual plastic and metal rings holding the shaving heads in place.
Disconnect your shaver from the power outlet and make sure it's turned off before beginning. If you're replacing the shaving heads with new ones, you can skip steps 4-7.
Disconnect your shaver from the power outlet and make sure it's turned off before beginning. If you're replacing the shaving heads with new ones, you can skip steps 4-7.
- Remove the shaving head holder from the shaving unit on the top of your shaver. Depending on the model, you can either press the button on the front of the shaving unit to open it and then lift it off the hinge, or simply pull the shaving head holder off the shaving unit.
- Twist each retaining ring counterclockwise to unlock it.
- Lift the shaving heads out of the shaving head holder.
- Remove the cutters from the guards. Note: each cutter and guard forms a unique set, so avoid mixing them up.
- Rinse the cutter with warm water.
- Rinse the guard with warm water.
- Place each cutter back into its guard.
- With the shaving head holder held upside down, reinsert the shaving heads with the tops of the guards facing downwards.
- Put the retaining ring on top of the shaving head. The small protrusions you use to grip and twist the rings should face upwards.
- Twist the retaining rings clockwise to lock the shaving heads in place.

Shavers with a retaining frame
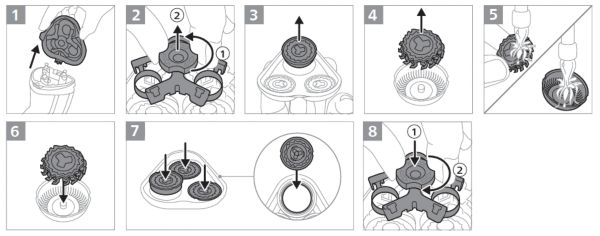
The information in this section applies to all Philips shavers with a plastic frame or bracket holding the shaving heads in place.
Disconnect your shaver from the power outlet and make sure it's turned off before beginning. If you're replacing the shaving heads with new ones, you can skip steps 5-6.
Disconnect your shaver from the power outlet and make sure it's turned off before beginning. If you're replacing the shaving heads with new ones, you can skip steps 5-6.
- Remove the shaving head holder from the handle of your shaver.
- Twist the dial on the retaining frame counterclockwise to unlock it (1), then lift it (2).
- Lift the shaving heads out of the holder.
- Remove the cutters from the guards. Note: each cutter and guard forms a unique set, so avoid mixing them up.
- If you need to clean your shaver, rinse each cutter and guard with warm water.
- Place each cutter back into its guard.
- With the shaving head holder held upside down, reinsert the shaving heads with the tops of the guards facing downwards.
- Put the retaining frame on the shaving heads with the dial facing upwards (1), then twist the dial to lock the frame in place (2).

After replacing the shaving heads
If you have recently replaced the shaving heads of your Philips shaver with new ones, you may experience mild skin discomfort when shaving with the new heads.
We recommend allowing 21 days for your skin to adapt to the shaving heads. If you experience redness or irritation, consider applying a mild, alcohol-free lotion to soothe your skin after shaving.
We recommend allowing 21 days for your skin to adapt to the shaving heads. If you experience redness or irritation, consider applying a mild, alcohol-free lotion to soothe your skin after shaving.
