When should I replace the cartridge of my Philips cleaning station?
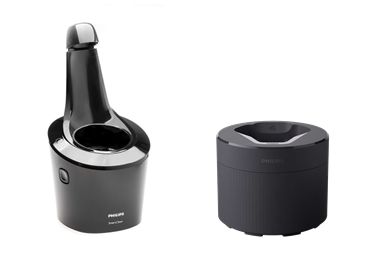
In this FAQ, you can find out how and when to change the cartridge in your Philips Quick Clean Pod (shown on the right) and SmartClean (shown on the left).
Note: an automatic cleaning system is not a replacement for manual thorough cleaning. Philips recommends thoroughly cleaning your shaver at least once per month. Please refer to your user manual for details.

When to replace your Quick Clean Pod cartridge
Several factors can influence how quickly your cleaning fluid level gets depleted. These include the frequency of cleaning, temperature, and other environmental factors that cause the fluid to evaporate.
When you need to replace your Quick Clean Pod cartridge, the small window (shown in the illustration below) will change color.
The table below provides a rough guide of how many cleaning cycles you'll get out of each cartridge, and how often you'll need to replace it, based on how often you use your Quick Clean Pod.
| How often you clean your shaver | Number of cleaning cycles per cartridge | How often your cartridge needs to be replaced (on average) |
|---|---|---|
| Every day | Approx. 30 | Every month |
| A few times per week | Approx. 20 | Every 2 months |
| Every week | Approx. 13 | Every 3 months |
| Every month | Approx.3 | Every 3 months |

How to replace your Quick Clean Pod cartridge
- Twist and remove the top of your Philips Quick Clean Pod.
- Lift out the old cartridge and pour away any residual cleaning fluid (it's safe to dispose of it in the sink). Recycle the empty cartridge according to local regulations.
- Remove the lid from your new cartridge and pull off the seal.
- Press down the handle on the cartridge to break the snap hook.
- Use the handle to lift the new cartridge and place it into your Quick Clean Pod.
- Place the top back on your Quick Clean Pod and twist it until firmly attached.
If you need replacement cartridges for your Quick Clean Pod, click here.

When to replace your SmartClean cartridge
When you need to replace your SmartClean cartridge, an orange symbol with two arrows will start flashing on your cleaning system.
How to replace your SmartClean cartridge
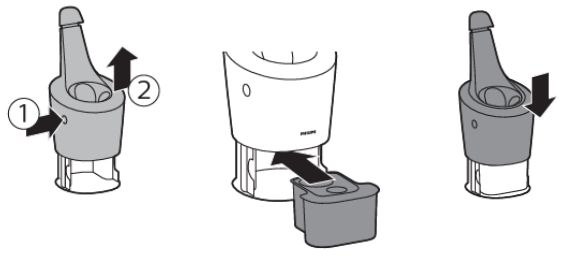
- Hold your SmartClean system firmly, and press the button on the side. Allow the system to rise to expose the cartridge slot.
- Slide out the old cartridge and pour away any residual cleaning fluid (it's safe to dispose of it in the sink). Recycle the empty cartridge according to local regulations.
- Remove the seal from the top of your new cartridge and slide it into the slot.
- Press down on the SmartClean system's main body to close the cartridge compartment. Press until you hear a click. This means the cartridge compartment is securely closed.
If you need replacement cartridges for your SmartClean, click here.

