Philips Support

How to perform a channel search in my Philips TV?

Published on 2016-12-29

You only need to search for channels if you are using an antenna connection without a cable or satellite box.

Before you perform the installation procedure, be sure that you have connected the incoming cable or antenna cable to the correct input, ‘TV ANTENNA' and/or ‘SAT'.

TV's rear connectors

Follow the instructions below to program the TV:

1) Press the [Home] button on the remote control to access the home menu.
2) Use the cursor buttons [Up], [Down], [Left] and [Right] to select [Setup] and press the [OK] button to confirm.
3) Select [Search for channels] or [Search for satellite] depending on the type of antenna connection used and press the [OK] button to access the automatic installation screen (see image below)

Note: You need to set a child lock code before you can search for channels. You can set it up in the [Setup] > [Channel settings] > [Child lock] menu.

4) If the Child lock is activated, the screen will prompt you to enter your pin code. If you have forgotten your pin code, you can reset the pin code in the [Setup] > [Channel settings] > [Child lock] > [Change code] menu. Refer to the FAQ I have forgotten my 4-digit pin code. How can I reset it?.

If you have selected [Search for channels], proceed as follows:

1) Select [Update channels] or [Reinstall Channels] and press the [OK] button.

a. When [Update channels] is selected, the TV will update your current channel list
b. When [Reinstall Channels] is selected, the TV will search and store all channels again

Note: You will lose your preference channel order after channel search. You will need to reorder the channels again.

i. Press the cursor [Up] or [Down] to select the country where you are located and press the [OK] button to confirm.
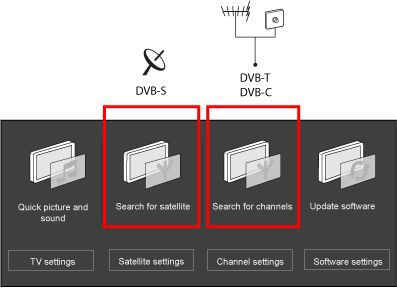
ii. Select [Antenna (DVB-T)] or [Cable (DVB-C)] in the Installation mode depending on the type of antenna connection used and press the [OK] button.

  • When [Antenna (DVB-T)] is selected, the TV will detect antenna signals and will search for antenna TV channels available in your local area

Note: When you use cable TV and select [Antenna (DVB-T)], the TV will only store analog cable channels.

  • When [Cable (DVB-C)] is selected, the TV will detect cable company supplied signals and will search for cable TV channels available in your area

Note: Depending on the country that you have selected, your TV will prompt you to select your cable provider. If your cable provider is not in the list, select [Others].

iii. Select [Start] and press the [OK] button to start auto programming.

Only for [Cable (DVB-C)]:

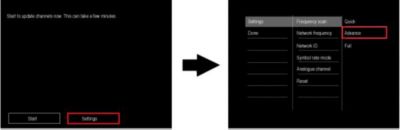
  • For certain countries, you have the option to set the [Network ID] when you select the [Advanced] scan mode in the [Settings] > [Frequency scan] menu. In this mode, the channel search will take a shorter time to find all the channels compared to the [Full] scan mode. (See image below)
  • If you do not have the [Network ID] option, we recommend you to use [Full] scan mode in the [Settings] > [Frequency scan] menu in order to find all the channels. In this mode, the channel search may take thirty minutes or more depending on the TV channels available in your area.
  • Depending on the country that you have selected, your TV may prompt you to enter your provider's network frequency

2) The menu screen disappears and the progress of auto programming is displayed. The progress bar indicates the number of analog and digital channels found.
3) Once the installation is completed, press the [OK] button and the TV will automatically exit the menu.

If you have selected [Search for satellite], proceed as follows:

1) Select [Update satellite] or [Reinstall satellites] and press the [OK] button.

a. When [Update satellite] is selected, the TV will update your current channel list.
b. When [Reinstall satellites] is selected, the TV will search and store all channels again.

Note: You will lose your channel order preferences after channel search. You will need to reorder the channels again.

i. Select how many satellites (LNBs) you want to install and press the [OK] button.
ii. If you wish to change the satellite (LNBs) setting, select [Settings] and choose [Connection type] to change the setting.

  • For single satellite reception choose: [One satellite]
  • For two satellites choose: [Two satellites]
  • For more than two satellites choose: [More satellites]

iii. Select [Start] and press the [OK] button to search for satellites.
iv. Once the satellites are found, select [Install] and press the [OK] button.

2) The menu screen disappears and the progress of auto programming is displayed. The progress bar indicates the number of TV and radio channels found.
3) Once the installation is completed, press the [OK] button and the TV will automatically exit the menu.

If your TV does not find any channels after channel search:

  • Make sure that your TV has the latest software installed
  • Check the incoming cable or antenna signal connection to make sure that it is properly secured to the TV's antenna input
  • Connect the antenna directly to the TV. Do not use an antenna cable splitter or loop through your external device such as set-top box or DVD recorder.

Please be aware that:

  • Different service providers use their own channel lists in which contains a predefined channel order (arrangement) and the frequency where the TV can find the channels
  • Most service providers broadcast free digital, encrypted digital and analog channels
  • If you perform [Reinstall Channels] or [Reinstall satellites], your TV will reorder the channels according to the channel order predefined by the service provider. After the channel search, you can rearrange the channels to suit your preference in the channel grid with the [Reorder] feature in the options menu.
  • If you perform [Update channels] or [Update satellite], your TV will check for updates and readjust the stored channels. Your channel list will not be influenced and new channels will be added to the end of your channel list.

The information on this page applies to the following models: 55PFL7606H/12 , 47PFL7606H/12 , 42PFL7606H/12 .

Frequently Asked Questions

Contact Philips

We are happy to help you

Looking for something else?

Discover all Philips Support options

Our site can best be viewed with the latest version of Microsoft Edge, Google Chrome or Firefox.